Quick Guide to Blackboard Collaborate for Participants
Ir a la navegación
Ir a la búsqueda
What is it?
Blackboard Collaborate is a virtual platform that allows you to work online synchronically (live sessions) and asynchronically (pre-recorded items). Furthermore, this platform allows us to organize a wide variety of activities such as tutorials, live sessions, pre-recorded master talks, meetings and other teaching activities. Participants will be engaged by exchanging text messages, displaying videos, sharing their desktop and links to websites, writing on whiteboards, sending multimedia files, etc.
Requirements:
Before the session:
- Be sure to have the latest java version. You can download it here.
- Find a relatively silent and comfortable place with no distractions.
- Use the Audio Wizard to ensure that the audio is working correctly prior to your session. You can test out the audio on this website.Watch this demo
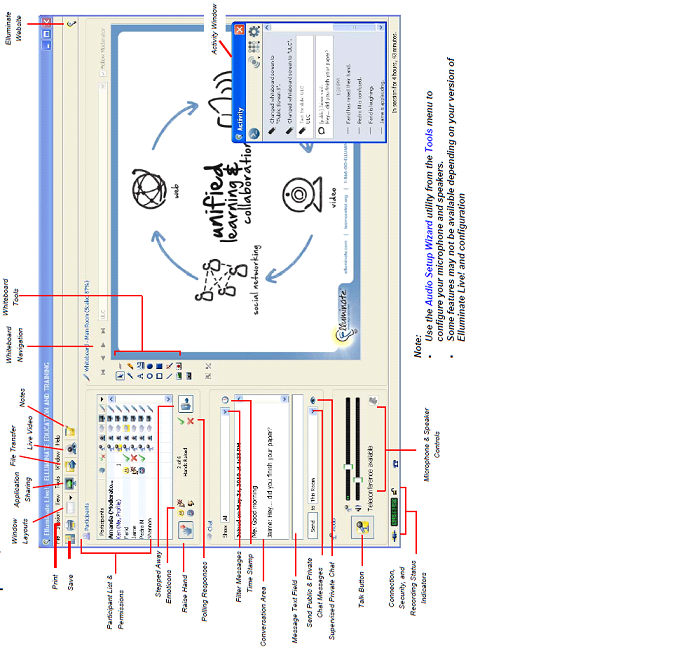
- Familiarize yourself with the buttons shown on the diagram included at the bottom of this quick guide.
During the session:
- Be sure to join the session 10 minutes prior to the start so as to guarantee that everything is working properly.
- Set your connection speed to the Internet. Avoid running other programmes to devote all the connection to Blackboard collaborate. If not, the programme will run slowly and will not be working as desired.
- Use good quality headphones and avoid the computer’s integrated speakers and microphones. Double-check that your audio works properly.
How to use it?
- The lecturer will send you information regarding the date and time in which the video conference will be held.
- Connect to your Nebrija’s online campus. Look inside for the tool called “Videoconference” and remember that maximum punctuality is required.
- At the beginning of the session, the moderator (in this case the lecturer) will be giving detailed and clear instructions on how to proceed and an explanation of the different stages and activities that will be carried out during the session. Make sure you listen carefully and you understand all the instructions given.
- The moderator will make yes / no questions to monitor and check students’ understanding. Participants may answer by using the “tick” or “cross” button located below (and to the right of) the participants’ list.
- Any participant willing to talk may do so by raising their hand, using the “hand” button located below (and to the left of ) the participants’ list. A number will appear beside your name indicating your turn number.
- Use chat to send text messages to other participants and the moderator during the session.
- In order to talk and be heard, the participant has to click on the microphone button placed beside your names. If you click and it does not work, you might need to ask the moderator to give you specific permission (you can do that through the chat).
- Your video image can be displayed and shared by clicking on the “camera” button placed on top of the participants’ list.
- The moderator will be giving us permission for specific tasks according to the sessions’ needs. Things for which we need permission are: uploading a PowerPoint, starting or stopping recordings, conduct a "Web Tour" (open browser window on participants' computers), transfer files to participants, make other participants moderators, create a new blank screen on the whiteboard, etc.
